SERVICE NOTE 011A
K9AXN SERVICE NOTE 011A:
HALLICRAFTERS SR-2000 AND SR-400 1st I.F. ALIGNMENT PROCEDURES
The Hallicrafters Users and Maintenance guide speaks to the alignment of the 6.5MC 1st I.F. subsystem as though it were a simple adjustment that should never need to be tampered with??? Truth be told, they were certain that there were very few SR-2000 owners that could successfully align the system. Bob Irwin chief engineer at Hallicrafters wrote in later correspondence, “that adjustment is for experts only”.
Some of you have had some experience with sweep aligning broad band systems and are familiar with the difficulty of avoiding inadvertent stagger tuning without using swamping techniques or making phase measurements to verify center resonance. In some radios, stagger tuning was part of the design, but in the SR-2000 or SR-400 series radios it will do nothing but denigrate performance.
There is a procedure to sweep align the 1st I.F. system in the SR-400A final test manual that can be found on both Hallicrafters reflectors. The same procedure was used on the SR-400 series and SR-2000. Even when executed properly, that procedure will provide marginal results at best and only if you are lucky. Sweep aligning a broad band system that uses two tuned in and out transformers without inadvertently stagger tuning is more luck than talent.
The following two links represent a simplified and certain way to align this system. It is simple, and what you are doing will be intuitively obvious. Please read the internals before aligning the system.
Internals of the 1st I.F. system in the SR-2000 and SR-400 series radios:
It is a broadband 500kc wide broad band circuit. It is composed of T1, V3, and T2. T1 and T2 are the same part number and both the primary and secondary are shunted with a 22K resistor to broaden the band pass. The resistor reduces the Q enough to create an approximately 150kc @ 3db band pass. To further broaden it to 500kc @ 3db, tight coupling is implemented in the transformers.
This paragraph provides an intimate understanding of the 6.5Mc I.F. system for those who are interested.
The transformers in the SR-2000, the first to be built in the SR2000/400 series used a 24pf capacitor across the primary of both T1 and T2. The Hallicrafters engineers implemented tight coupling and the resistor to provided a 500kc band pass @3db, but only if the system was accurately aligned. Later in the SR-400 series they changed the cap to 22pf which forced the tuning slug further into the transformer tightening the coupling, resulting in a slightly wider pass band: Approximately 15kc.
The additional 15kc corrected for a 15kc skew in the output of T2 between transmit and receive mode. This is caused by the addition of approximately 1pf to 2pf to the secondary of T2 when in transmit mode. This is a result of the CR11 gate being opened to send the heterodyne signal to V11 the transmit mixer. Please follow this sequence. T2 output, C97, C106, Cr11, C107, L19, and C109. This path adds a bit of capacity to the T2 output tuned circuit reducing the frequency by approximately 15kc. This is the fundamental reason for the 24pf to 22pf change. Is the change necessary? Probably not, but it forgives the possibility that the alignment will likely be poorly done.
Important:
Note that the alignment is performed in transmit mode! The reason is that the droop at the band edges has a more profound effect on the transmit drive than perceptible receive performance.
Transmit drive in CW and Tune modes in Hallicrafters SR-2000 and 400 series, forces the carrier through the filter at -20db to -30db down the slope of the USB side of the crystal filter providing a clean signal without distortion and harmonics. This requires all systems to be performing to specs if full drive to the finals in CW and tune mode is expected. SSB mode is unaffected. Transmit drive must be capable of saturating the finals in tune mode or under loading will occur resulting in excessive screen current when SSB mode is used. SEE NOTE 40A for a simple procedure to verify appropriate transmit drive when you finish alignment.
Preinspection:
Pre-inspection is required before alignment is begun. As with any discretely wired radio, wire routing can be random and may result in performance anomalies. This note is focusing on the wiring sensitivities in the 1st I.F. only. There are two wires specifically in the SR-2000 that are generally routed incorrectly. Check the SR-400 as well. They must not be near each other: One connecting C99 to pin8 of V2A and one connecting the output of T2 to C97. If they are close, a positive feedback loop will occur in the I.F. system making it all but impossible to achieve a ripple free 500kc band pass in receive mode. This also results in a noisy radio, sounding somewhat like using a Q multiplier. I have sweep photos of the results if there is interest. The SR-400 and SR-400A use different pin outs. Compare the SR-2000 schematic and SR-400 to verify pins used.
THE FOLLOWING ARE TWO RETIRED SWEEP ALIGNMENT TECHNIQUES THAT CAN BE USED TO BECOME FAMILIAR WITH SWEEP ALIGNMENT PROCEDURES OR FOR EDUCATIONAL PURPOSES.
The following are two retired procedures that will deliver accurate and consistent results and are much simpler than the procedure in the final test manual.
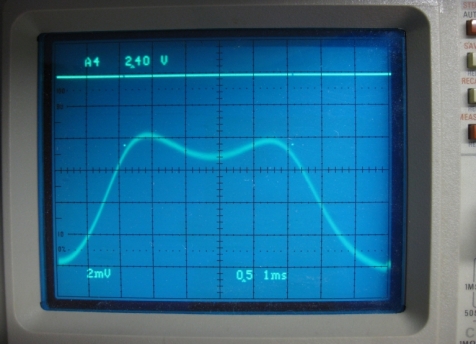
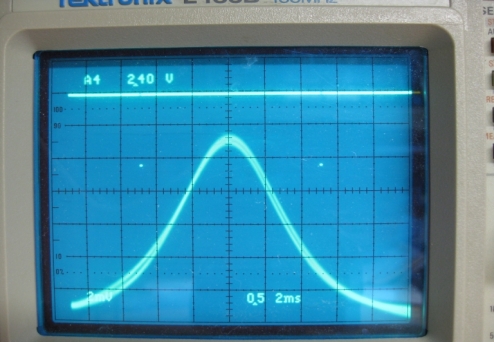
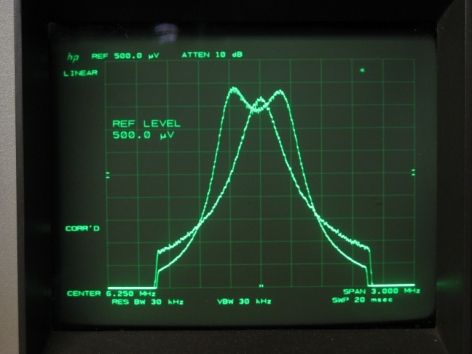
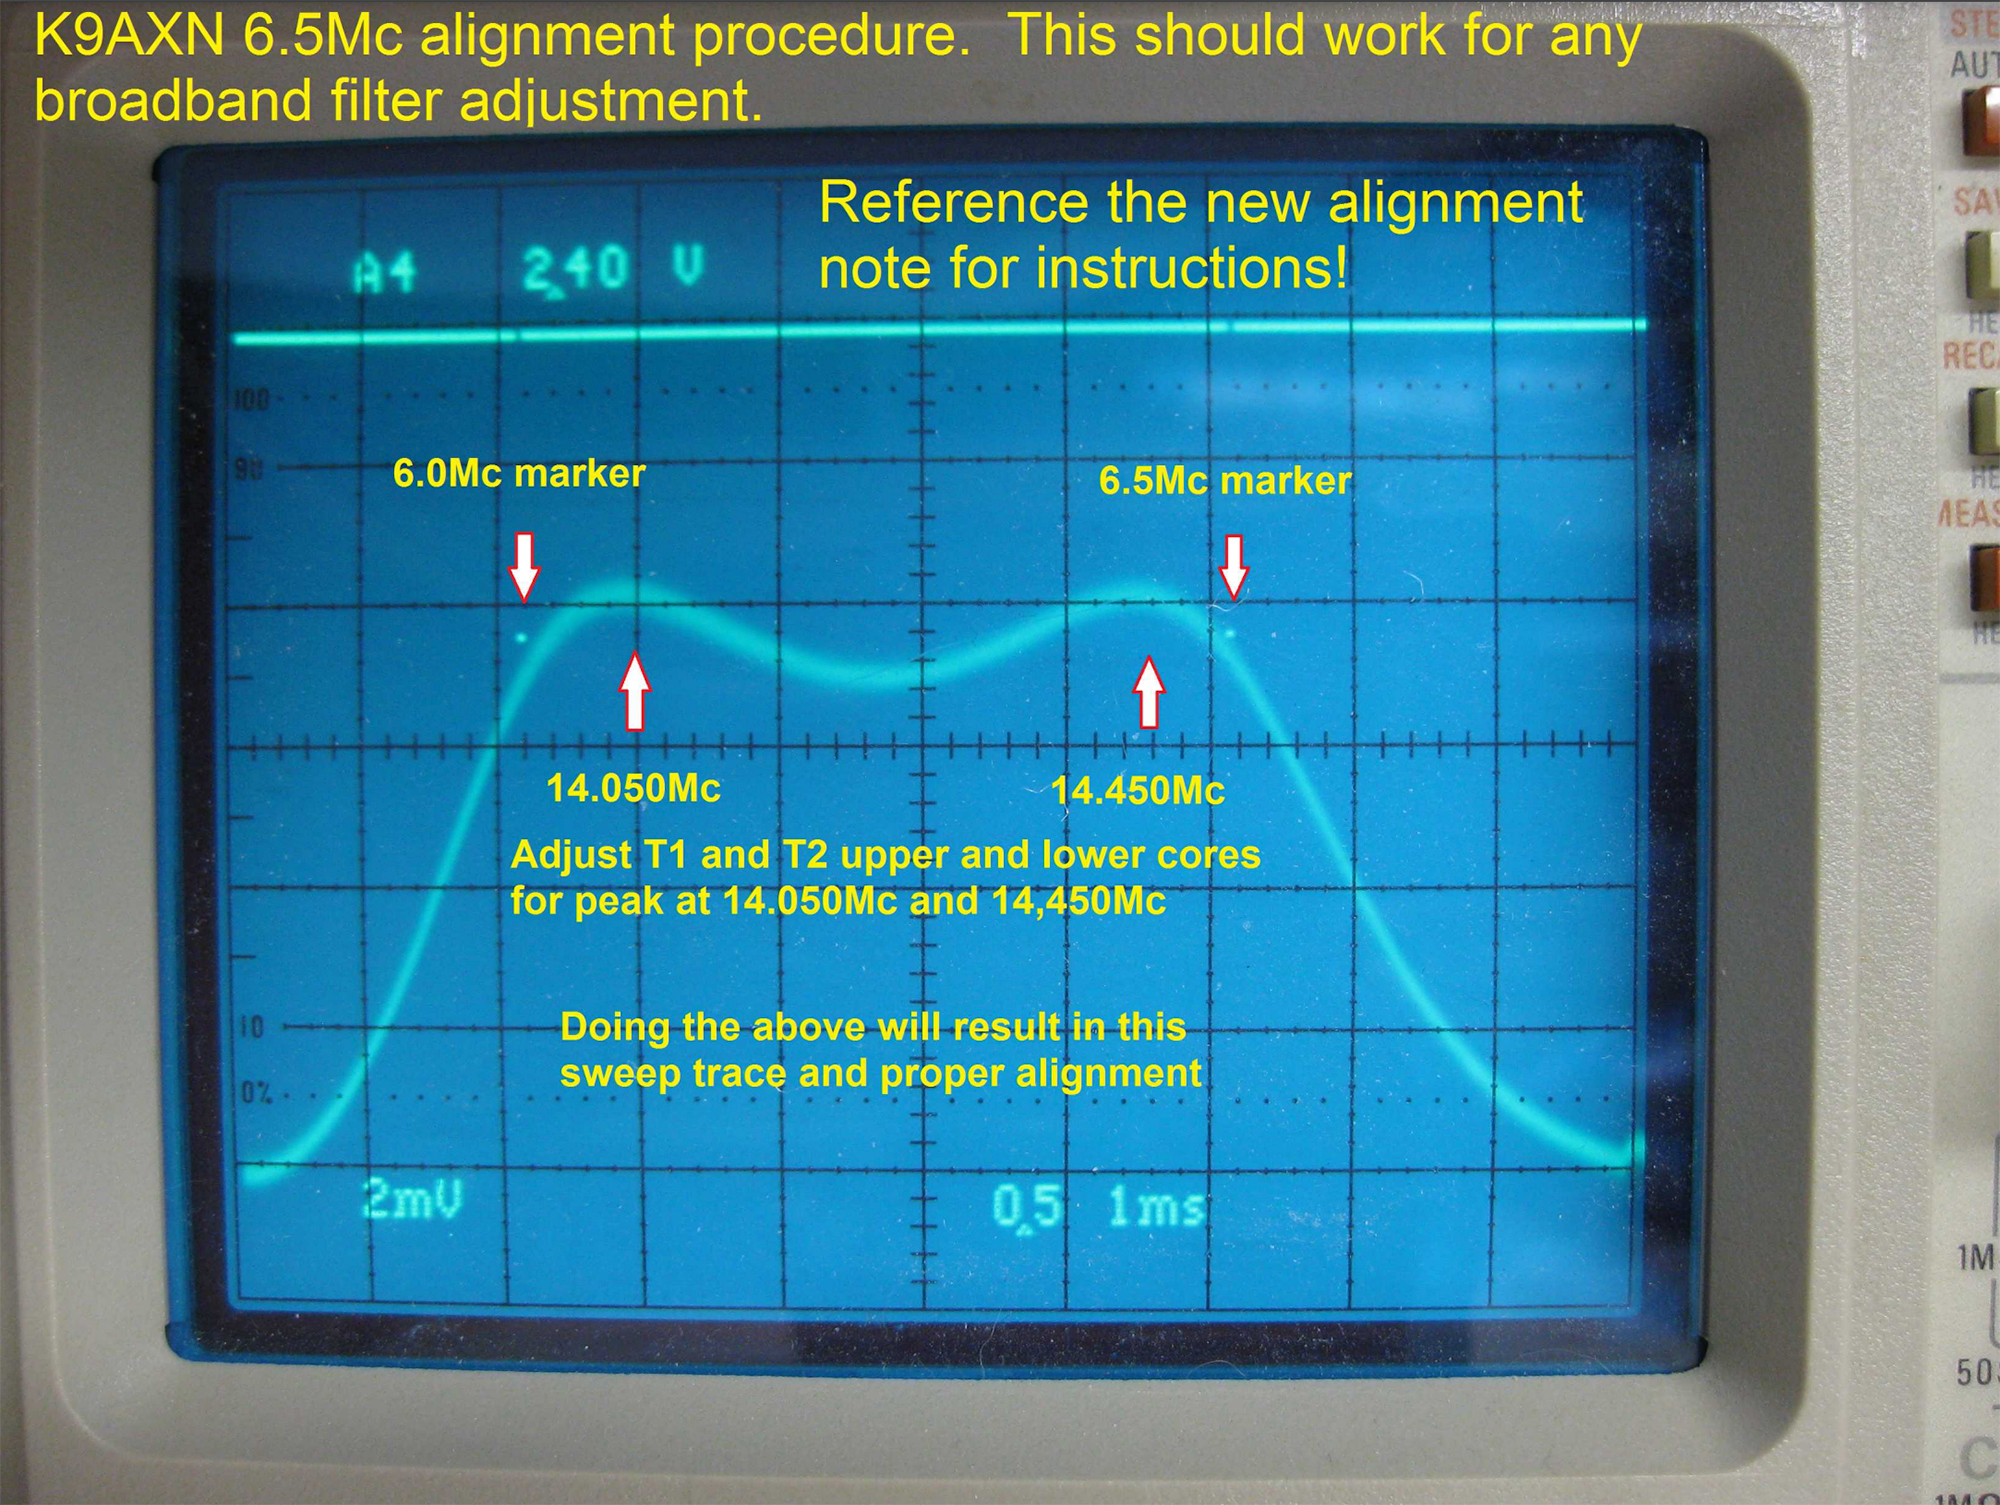
One procedure is a swamp/sweep process where you can view the results on the scope and make sense of what you are doing. The second which is very simple uses the swamp procedure but simply uses the scope as a volt meter. Neither is a new idea, probably pre-date me. Both are far and a way simpler than traditional sweep alignment techniques. Techniques #1 and #2 are described in red at the end of this page and the accompanying photos can be found in the photos section, 6.5Mc alignment. When you view the photos, simply place your mouse arrow over the photo and the description will appear.


TOOLS REQUIRED FOR THE SWAMPING ALIGNMENT TECHNIQUE
- Two swamping jumpers made with a .01uf 600 volt film cap in series with a 1000 ohm resistor terminated with mini grabbers: All insulated.
- Oscilloscope with demod probe.
- Sweep generator that can sweep from 5.75mc to 6.75mc preferably with two markers.
- 50 ohm coax with .01uf 600 volt film cap in series with center conductor and terminated with mini grabbers. This cable will be used to connect the signal generator to the injection point.
SETUP:
- Remove VFO plug to disable the VFO.
- Remove the heterodyne oscillator V12.
- Remove the USB crystal.
- Install 50 ohm terminator with “T” on signal generator connector.
- All sweeps are done with 50ms sweep time unless otherwise stated.
TECHNIQUE 1 PROCEDURE:
NOTE: ALL ADJUSTMENTS MUST BE DONE IN TRANSMIT MODE!!!!!!
STEP 1 --- THE PRIMARY OF T2:
- Install swamping jumper across the output of T2.
- Inject 15mv from 5.75mc to 6.75mc into V3P2.
- Sense at V4P2 with demod probe and scope set to 50ms, 5mv, and in sync with sweep generator. Set markers for 6.00mc and 6.50mc.
- Go to transmit mode.
- You should see a fairly narrow, about 150kc response, much narrower than the 500kc pass band response. This is a result of swamping the output tuned circuit of T2. This negates the broadening effect of tight coupling.
- Adjust the bottom slug (Primary) in T2 to center the response at 6.25mc. The bottom slugs in T1 and 2 are the primaries.
STEP 2 --- THE SECONDARY OF T2:
- Remove the swamping circuit from the output of T2 and install it across the input of T2
- Inject 20mv into V3P2.
- Adjust top slug of T2 (Secondary) to center the signal at 6.25mc.
STEP 3 --- THE PRIMARY OF T1:
- Remove the swamping circuit from the input of T2.
- Swamp the secondary of T1 and T2.
- Inject 20mv into V2P2.
- Adjust the bottom (Primary) slug of T1 to center the result.
STEP 4 --- THE SECONDARY OF T1:
- Move the swamping circuit from the output of T1 to the input of T1.
- Inject 20mv into V2P2.
- Adjust the top (Secondary) slug of T1 to center the peak of the signal.
STEP 5 --- Remove both swamping jumpers.
STEP 6 --- VALIDATE THE ADJUSTMENT OF T2:
- Demod probe at V4P2
- Inject 5mv into V3P2 and note the wave shape covers the 6.0mc to 6.5mc band pass at the 3db, 70% point. It will normally be somewhat droopy in the middle but that is normal for a double tuned transformer using tight coupling. Do not change the adjustment to make it look perfect.
STEP 7 --- VALIDATE THE ADJUSTMENT OF T1:
- Inject 800uv into V2P2 and note the wave shape covers the 6.0mc to 6.5mc band pass at the 3db, 70% point. It will normally be somewhat droopy in the middle but that is normal for a double tuned transformer using tight coupling. Do not change the adjustment to make it look perfect.
STEP 8 --- FINAL EVALUATION:
- Reinstall USB crystal and VFO/accessory plug.
- Attach scope 10X probe to V11AP2.
- Go to transmit mode and verify that there is a .9v to 1.1v signal while tuning the VFO from the low to high end with no more than a 3db change while in transmit mode. If so, you are finished and the alignment is correct. If not, redo the adjustment, something slipped.
- You can tweak the adjustments without the swamping jumpers while sweeping in step 6 but go very slow with it. Remember sweep adjustments on a double tuned double transformer system can be very deceiving. There is a tendency to stagger tune to make up for band pass anomalies resulting in a deaf radio with poor transmit drive. The use of the swamping circuits places the adjustments right on.
Tools required for technique 2:
- Two swamping jumpers made with a .01uf 600 volt film cap in series with a 1000 ohm resistor terminated with mini grabbers: All insulated.
- Oscilloscope with demod probe or HP 410*.
- Signal generator.
- 50 ohm coax with .01uf 600 volt film cap in series with center conductor and terminated with mini grabbers. This cable will be used to connect the signal generator to the injection point.
TECHNIQUE 2 PROCEDURE:
This procedure is the same as technique #1 except we do not use a sweep generator. A signal generator with an accurate frequency dial or a generator and a frequency counter will be used. In this method we inject a 6.25mc signal into the injection points and use the same scope, swamping networks and demod probe and test point. We then simply adjust the transformers for max voltage which corresponds to the 6.25mc center of the band pass. This is the simplest method and is very accurate. We have found the results of this method to be similar to the sweep/swamp method. So why use the sweep method? It’s interesting and maybe educational.
NOTE: The technique 2 procedure uses a signal generator. You can also simply set transmit mode with the VFO set to 250Kc which provides the signal in the center of the band. This is probably the simplest procedure and apologize for not placing it at the head of the note. e engineering staff stated that "it was only for experts". The swamping technique is far easier, and actually more accurate than sweep alignment. The swamping method can be used in other broadband systems providing the same results.
I will not edit this note to death but will be happy to entertain comments and suggestions where there is a clarity issue, something does not make sense, or anything regarding the alignment of the 1st I.F. system in the SR-2000/SR-400 series radios.
Hope you find this interesting and useful.
Kindest regards Jim K9AXN
